A practical guide to setting up, editing and maintaining your Purlia yarn and craft store.
Choose your starting point
Purlia is a WordPress block theme by ApusThemes. Store design lives in the Site Editor; merchandise, orders and checkout settings live in WooCommerce. Start with the path that matches your website.
6.7 or later. Use a maintained release compatible with your plugins.
PHP
7.4 or later for the theme. Use a maintained PHP release supported by your complete store stack.
WooCommerce
Install separately for products, cart, checkout and accounts. Its requirements can be higher than the theme minimum.
Editor
The native WordPress block editor and Site Editor; no page builder or proprietary options framework.
Optional services
MC4WP and a Mailchimp account for newsletters; WPForms for the styled contact form. Neither service is configured by theme activation.
Screenshots show the Purlia 1.0.1 workflow on WordPress 7.1. Menu labels can differ between WordPress, WooCommerce and plugin versions. The setting or block name is more useful than its exact screen position.
Install the correct ZIP, activate the theme and prepare the WordPress and WooCommerce foundation.
Understand your download
File or folder
Purpose
purlia-1.0.1.zip
The installable theme. Upload this ZIP in Appearance → Themes.
documentation/
This offline guide. Keep its assets folder with the HTML pages.
demo-content/
Optional sample data, 18 original Media files and explicit import/migration helpers. Use on staging.
Full download package
A container for the installable theme, documentation and optional sample content. Upload its inner theme ZIP, not the outer archive.
Install through WordPress
Sign in to WordPress with an account allowed to install themes.
Open Appearance → Themes → Add Theme → Upload Theme.
Select purlia-1.0.1.zip and choose Install Now.
After WordPress completes the installation, choose Activate.
Open the frontend and confirm that the Purlia layout loads. Open Appearance → Editor to begin customizing.
Add only the integrations you need
Plugin
Needed for
Included in theme ZIP?
WooCommerce
Selling products and using shop, account, cart and checkout features.
No; install it separately.
WordPress Importer
The optional sample-content import workflow.
No; use the official importer if importing demo data.
MC4WP: Mailchimp for WordPress
The optional newsletter form.
No.
WPForms
The optional styled contact form.
No.
Purlia Wishlist
Optional wishlist functionality, when supplied separately by ApusThemes.
No; it is not a required theme component.
The design also renders without WooCommerce. Commerce blocks require WooCommerce to provide their data and behavior. Do not install unrelated plugins simply to make an empty demo photo appear.
Set the site foundation
Set the store name and site language in Settings → General.
Check your permalink structure in Settings → Permalinks. Save it after a migration if pages return 404.
If using WooCommerce, complete its native setup and confirm its Shop, Cart, Checkout and My Account page assignments.
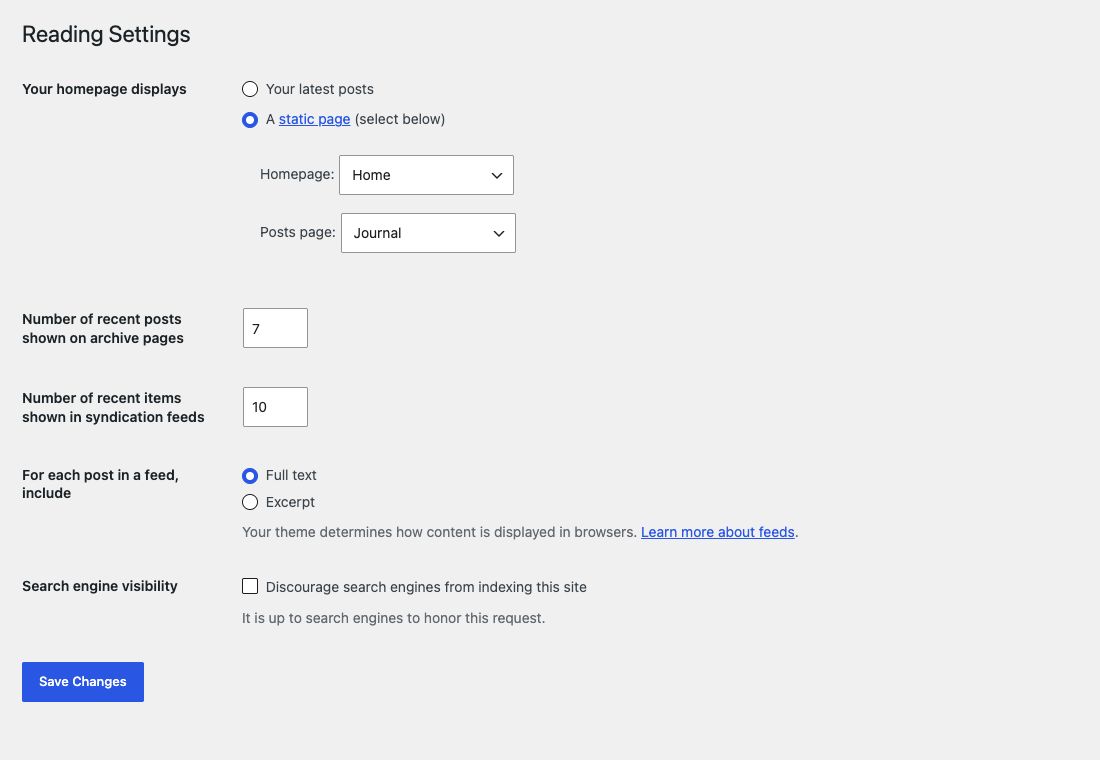
Choose your homepage and optional Journal page under Settings → Reading.
Replace placeholder photos, contact information and policy copy before launching.
What activation does
Purlia registers templates, patterns, styles and presentation features. It does not create a catalog, install plugins, enable gateways, change shipping zones, connect Mailchimp or import sample images. Product and page content remains in WordPress when you change themes.
Demo import & migration
Choose the workflow for a clean sample site or an existing Purlia installation.
Choose one workflow
Workflow
Use when
What it changes
Start without demo data
You want your own catalog and content.
Create pages with Purlia patterns and choose your own Media images.
Fresh demo import
You have a clean staging installation.
Imports sample pages, posts, products, variations and Media.
Existing demo migration
You already use an older Purlia demo with theme-file image URLs.
The optional export contains 16 pages, 6 journal posts, 14 products, 46 variations and 18 Media attachments. Yarn specifications, prices, inventory, contact details and policies are illustrative. The three pattern previews contain sample project notes, not professionally tested PDF patterns.
The export excludes customer accounts, orders, comments/reviews, API keys, subscribers and payment setup. Imported contact/newsletter form IDs are placeholders; create and select your own forms. Media originals are supplied in demo-content/media/.
Import a fresh demo with WP-CLI
This path uses the bundled image originals, so it does not depend on the public demo hosting those uploads. A developer or host can run these commands. Replace the example paths with the locations on your server.
Install and activate Purlia and WooCommerce on a clean staging site. Complete WooCommerce’s page creation.
Install and activate the official WordPress Importer. Place the entire demo-content folder on the server; keep all helper files and its Media subfolder together.
From the WordPress installation directory, prepare the product attributes:
The helper calls the official importer, repairs native image attachment IDs for the target site and rebuilds WooCommerce’s product lookup tables. Keep the command output and resolve any reported error before continuing.
Using the WordPress import screen
Create the global attributes listed in demo-content/attributes.json: Color, Fiber and Yarn weight. See Catalog and products.
Open Tools → Import → WordPress and select purlia-demo.xml. Assign content to your existing staging author.
Enable downloading/importing attachments. This GUI path requires the source demo to contain all exported Media URLs. If images are unavailable, use the offline CLI path instead.
After importing, have your developer run the finalizer below to repair image IDs and product lookup data:
The helper reuses marked demo attachments, imports only missing originals and replaces old Purlia theme-file image blocks. It retains merchant-selected Media and product images. It logs a temporary JSON backup location for changed page content; WordPress revisions also remain available where supported. A second run should not create duplicate marked images.
Complete either demo setup
Assign Home and Blog under Settings → Reading. Assign WooCommerce pages under WooCommerce → Settings → Advanced.
Save permalinks and inspect product/variation prices, stock and images.
Update Navigation links to your own page and category URLs. Review links in page content after a domain migration.
Set Color term swatches. Select your own optional contact and newsletter forms.
Replace demo policy copy and contact details. Configure actual shipping, tax and sandbox payment.
Compare Home 1–4, Shop, a variable product, Cart and Checkout on desktop/mobile before publishing.
Choose & edit a homepage
Four layouts share the Purlia visual language and use different editing paths.
Meet the four homepages
Design
Where to edit
Pattern / template
Home 1 — the original storefront
Site Editor → Templates → Front Page
Purlia homepage; the Front Page template.
Home 2 — The slow edit
Pages → your Home 2 page
Home 2 - The slow edit.
Home 3 — The making club
Pages → your Home 3 page
Home 3 - The making club.
Home 4 — The yarn atelier
Pages → your Home 4 page
Home 4 - The yarn atelier.
Choose the layout that best suits your product photography and content. You can publish the alternate homepages as normal pages while one remains the site’s front page.
Set up Home 1
Create and publish a page named Home if you do not have one.
Open Settings → Reading, select A static page and choose Home as the homepage.
Open Appearance → Editor → Templates → Front Page.
Use List View to find the hero, category cards, featured yarns and making panel. Edit their blocks and choose Media images.
Save the template. Review the frontend while signed out. If the save screen lists multiple entities, confirm only the changes you intend to publish.
Settings → Reading: choose your published Home and Journal pages. The page names shown belong to the sample site. Select the image to view it at full size.
Set up Home 2, Home 3 or Home 4
Create a new page under Pages → Add New.
Open the block inserter’s Patterns tab, choose the Purlia category and insert the matching homepage pattern.
In Page settings, select the matching Home 2, Home 3 or Home 4 template.
Choose your photos, replace the text and update every button/link to your own destinations. Publish the page.
To make it the main homepage, select it in Settings → Reading. Otherwise leave it as a normal page and link to it from Navigation.
Edit sections without losing their layout
Use List View to select an Image or Group hidden beneath overlapping hero text.
Replace copy in its existing Paragraph/Heading blocks. Keep heading levels meaningful.
Use the Product Collection block’s query controls for your intended collection, such as featured products. Product cards read product data from WooCommerce.
Retain Purlia CSS classes when changing text or photos. If a section loses its styling after being rebuilt, insert a fresh copy of that Purlia pattern and transfer the content.
Use fewer sections if you have limited content; remove the whole section group rather than leaving empty headings or buttons.
Update the Home submenu
Edit the Header’s Navigation block and set each Home submenu link to its published page. Use meaningful link labels if the public store should show a single homepage. Follow Header and navigation for the editing steps.
Branding, header & navigation
Set your store identity and keep shared elements consistent across the site.
Store title, logo and site icon
Set your store name in Settings → General. The default header/footer display the Site Title.
For a graphical logo, edit the Header, replace Site Title with a Site Logo block and select a Media image. Check its size on mobile.
Set the Site Icon using the control available in your WordPress version, often from the Site Logo settings. Use an icon that remains recognizable at small sizes.
Review the Footer title separately if you customized that part previously.
Change colors and typography
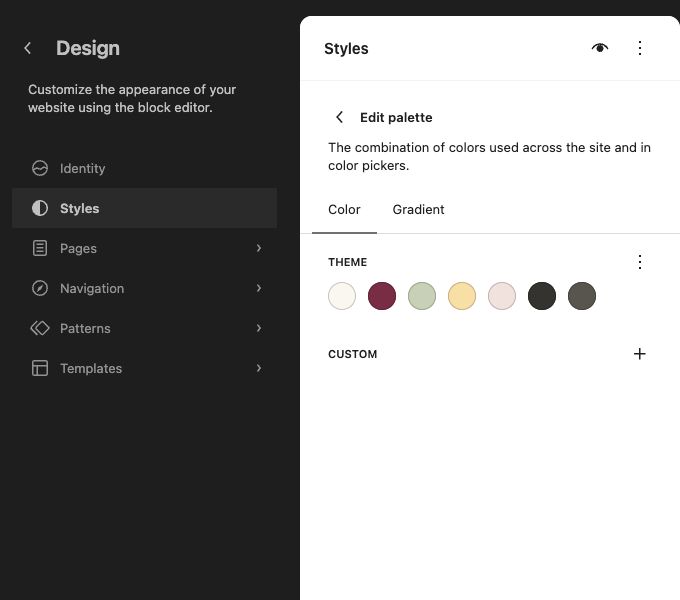
Open Appearance → Editor → Styles. Start with the palette and body/heading font families, preview several templates, then save. Purlia connects its component colors and font families to Global Styles. Individual block overrides still take precedence where you set them.
Preset
Default
Typical role
Ivory
#FAF7EF
Page background
Berry
#742D45
Titles, links and primary actions
Sage
#C8D0B5
Soft accent surfaces
Butter / Rose
#F4DFA1 / #F0E2DE
Secondary accents
Ink / Muted
#353330 / #57554E
Body and supporting text
The bundled font families are Cardo and Inter, served locally. Review text contrast and long headings after changing fonts or colors. Global font settings do not turn every component into the same font size; Purlia retains a responsive type hierarchy.
Appearance → Editor → Styles → Colors → Edit palette. Select a swatch to inspect or change it, then review contrast before saving. Select the image to view it at full size.
Edit the shared Header and announcement
Open Appearance → Editor → Patterns → Template Parts → Header.
Use List View to find the announcement Paragraph, store title/logo, Navigation and action blocks.
Replace the announcement with your actual offer. A free-shipping message is display text; it does not create a shipping rule.
Edit or remove links you do not intend to use. Save and review the header on desktop and mobile.
Edit Home links and the Shop mega menu
Select the Header’s Navigation block. Choose the menu items through its List View.
Update the Home submenu links to the published Home 1–4 pages you want to expose.
Within Shop, update the collection, fiber and helpful-page links. Choose actual product categories and attribute filters from your own store.
Keep the existing nested structure and Purlia classes when changing labels or destinations. Removing those classes can change the mega menu’s layout.
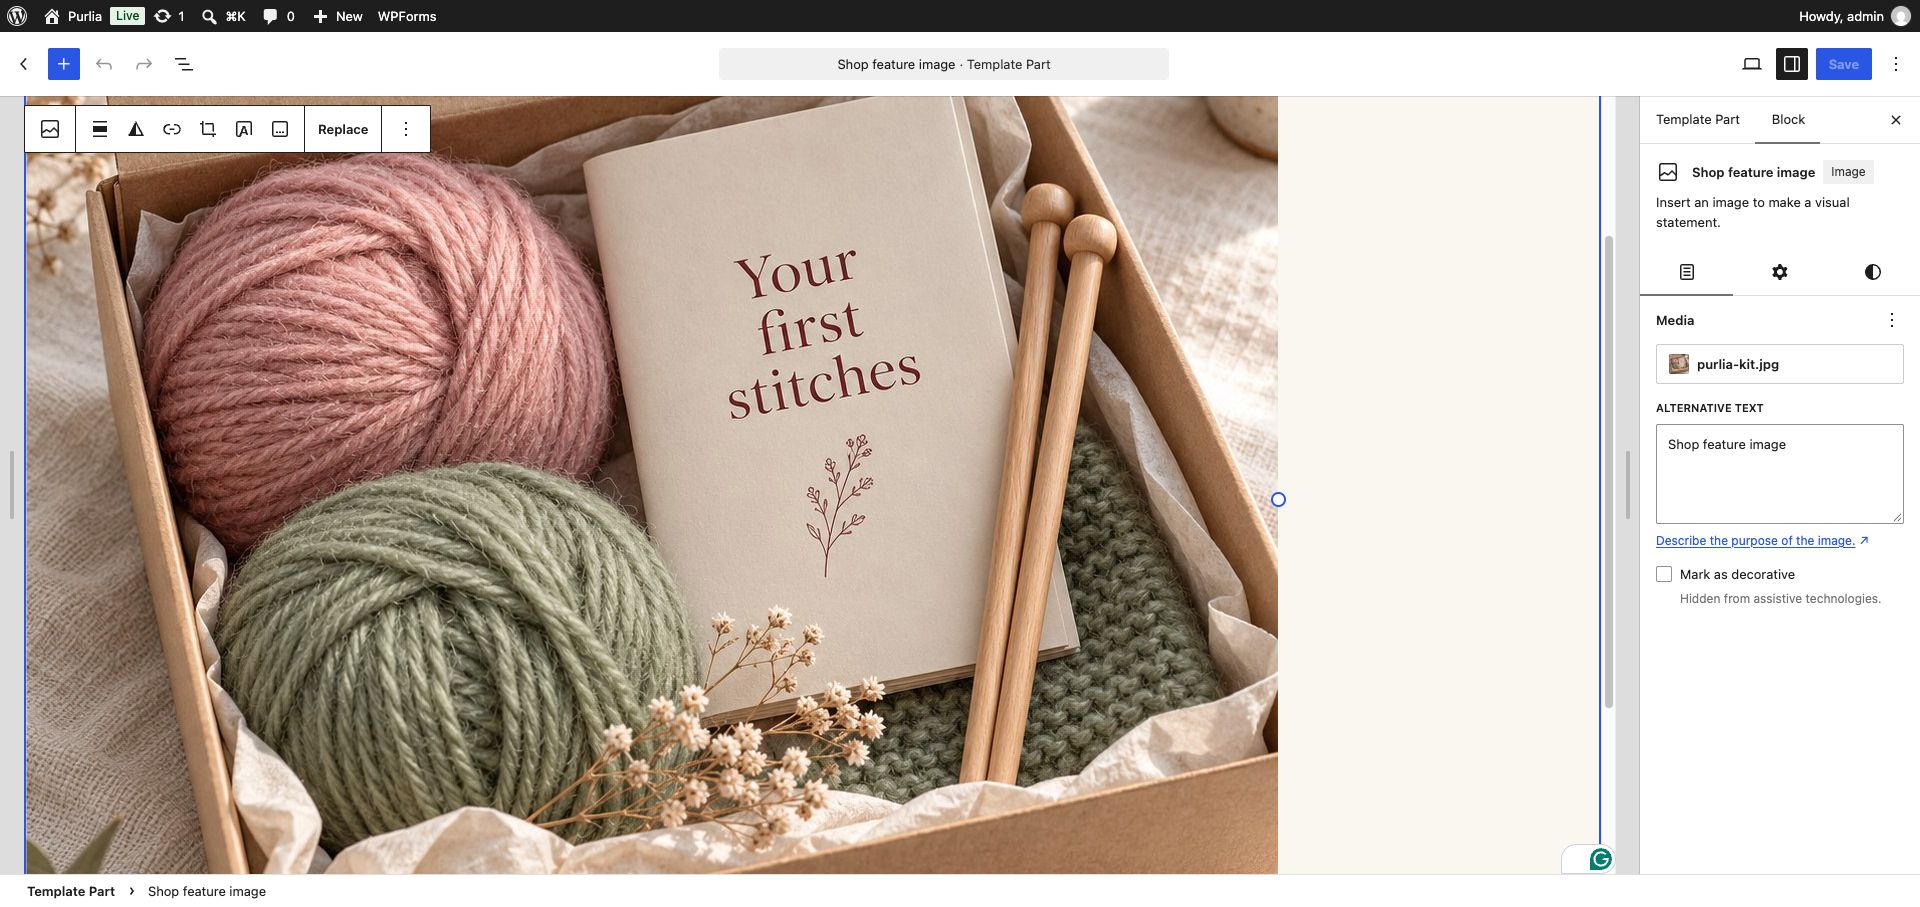
Edit the photo separately in the Shop feature image template part. The navigation feature link controls its destination and label.
Test mouse/keyboard opening, Escape, link destinations and the mobile Shop accordion.
Edit the Footer
Open the Footer template part to change its introduction, store title and newsletter area. Newsletter delivery is configured in MC4WP; see Newsletter and forms. Replace decorative demo social symbols with real links using a native Social Icons block, or remove them.
Replace images with native WordPress controls and understand the shared photo parts.
Replace a page image
Open the page in the block editor. For Home 1, open the Front Page template in the Site Editor.
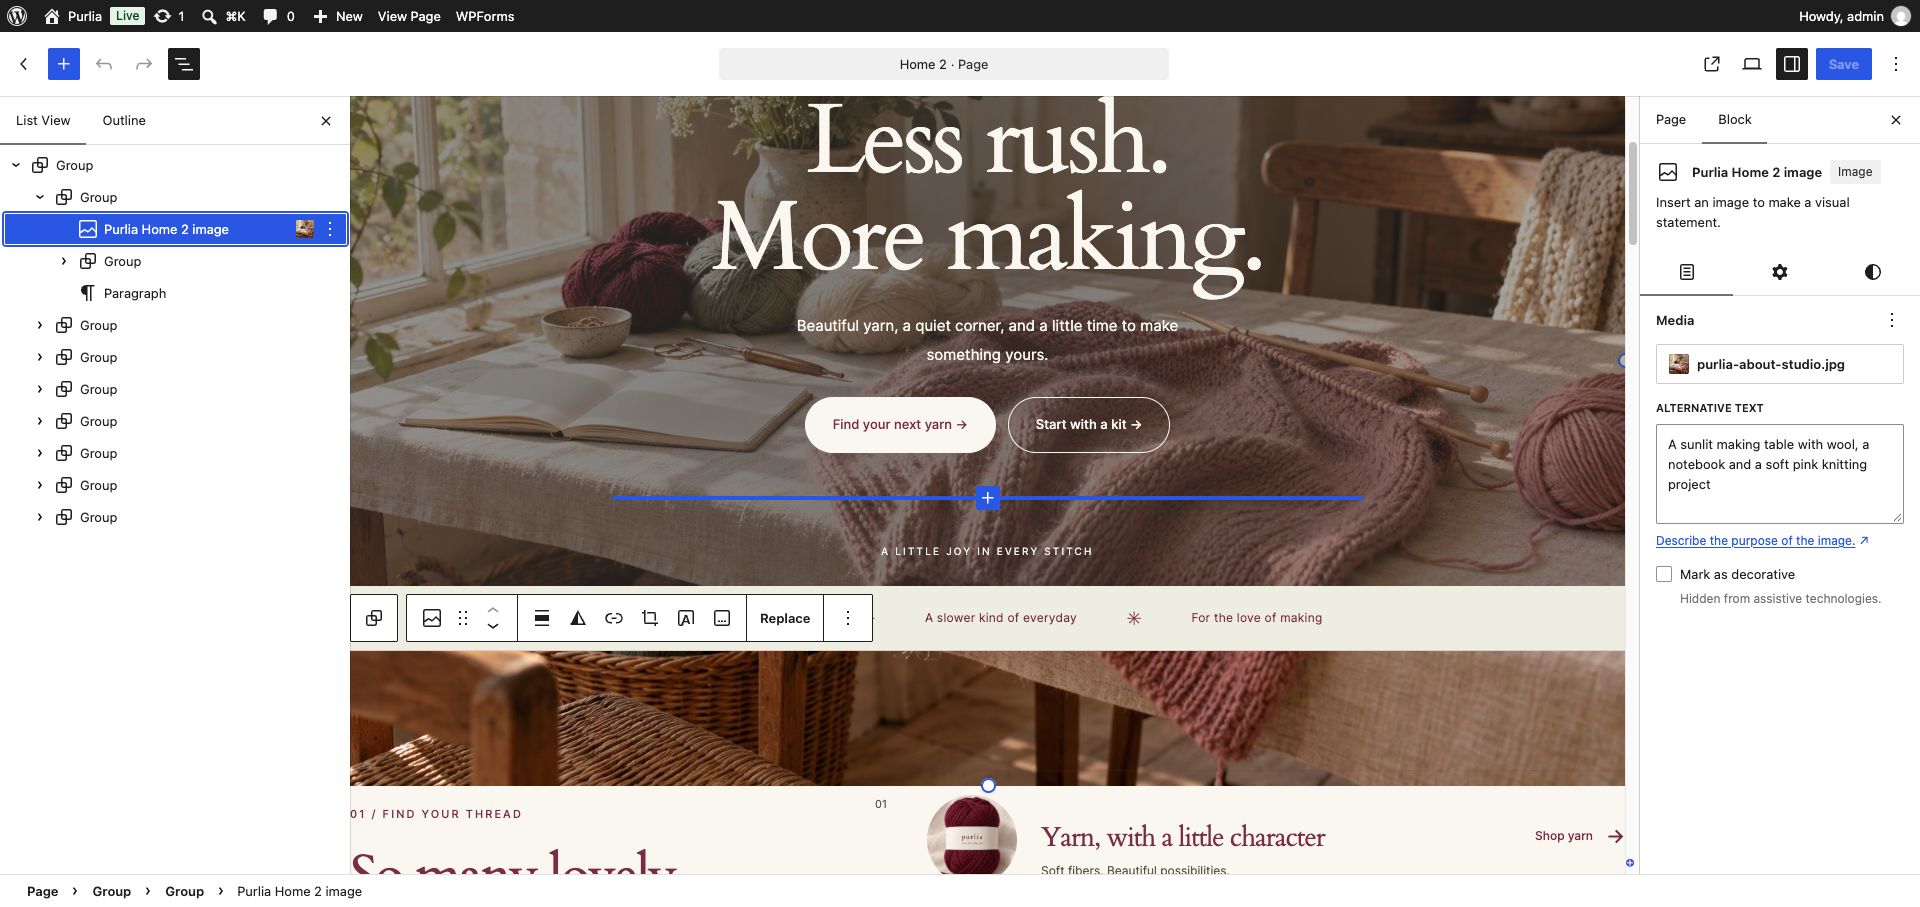
Select the Image block. If text overlaps it, select it from List View.
Use the block’s Media or Replace control and choose an existing Media item or upload a new photo.
Write useful alternative text, or mark a purely decorative image as decorative.
Preview the crop and mobile layout, then save. An image used in several blocks is not automatically replaced in every block when you choose a different attachment here.
A selected Home 2 photo shows its Media attachment in the editor sidebar. Select the image to view it at full size.
Know which image to edit
Photo
Where it is controlled
Home 1 hero/category/making images
Front Page template → its Image blocks
Home 2–4 and editorial page photos
The page’s Image blocks
Shop mega menu photo
Template Part → Shop feature image
Login, registration and password recovery photo
Template Part → Account welcome image
Account dashboard feature photo
Template Part → Account dashboard image
Product cover and gallery
The WooCommerce product’s image/gallery settings
Journal card/article featured image
The post’s Featured Image
Empty-state artwork
The relevant Cart, Mini Cart, Search or 404 template/pattern Image block
To edit a shared photo, open Appearance → Editor → Patterns → Template Parts, choose its named part, select the Image block and choose Media. The theme does not require editing a PHP image URL.
The Shop photo is a separate template part, so it can be changed independently of Navigation. Select the image to view it at full size.
Prepare useful images
Use
Suggested starting size
Composition
Wide hero or editorial photo
Around 1600 × 1000 px
Keep important subjects away from crop edges.
Product cover/gallery
Around 1200 × 1200 px
Use consistent framing for catalog cards.
Category card
Around 1000 × 1000 px
Allow room for a landscape crop.
Logo
A clean, high-quality source
Check small-screen legibility and background contrast.
These are starting points, not upload requirements. Compress photographs before uploading. Use JPEG, PNG or a format supported by your WordPress installation. Purlia uses attachment metadata for responsive sizes; available optimized WebP sidecars may be used for marked demo images. SVG uploads are not enabled by the theme.
If an image is missing or looks cropped
Confirm the attachment exists in Media and its original file is accessible.
Re-select the image if content was imported without its attachment or its image ID was not repaired.
Review the Image block’s aspect ratio/scale controls, then preview the actual page: Purlia uses cover crops in some layout areas.
Use a composition with more breathing room if the crop cuts off the subject.
After migrating from an older demo, follow the Media migration workflow instead of restoring hardcoded theme-file URLs.
Catalog, products & swatches
Build a native WooCommerce catalog that works with Purlia product cards and filters.
Organize your collection
Create product categories for your actual merchandise. The sample store uses Yarn, Knitting & Crochet Kits, Needles & Hooks and Patterns. Update header and homepage category links if your category names or slugs differ. Set useful product names, descriptions and images before featuring products on a homepage.
Create the global attributes
Display name
Slug
Used by Purlia
Color
color
Color swatches, variation choices and the Color filter
Fiber
fiber
Fiber specifications and the Fiber filter
Yarn weight
yarn-weight
Product specifications and the Yarn weight filter
Open Products → Attributes and create the global attributes you need.
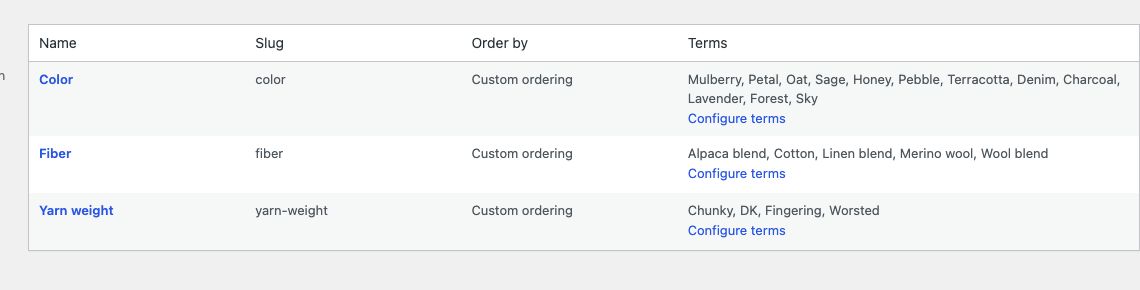
Choose Configure terms for an attribute and add your values, such as Mulberry, Sage or DK.
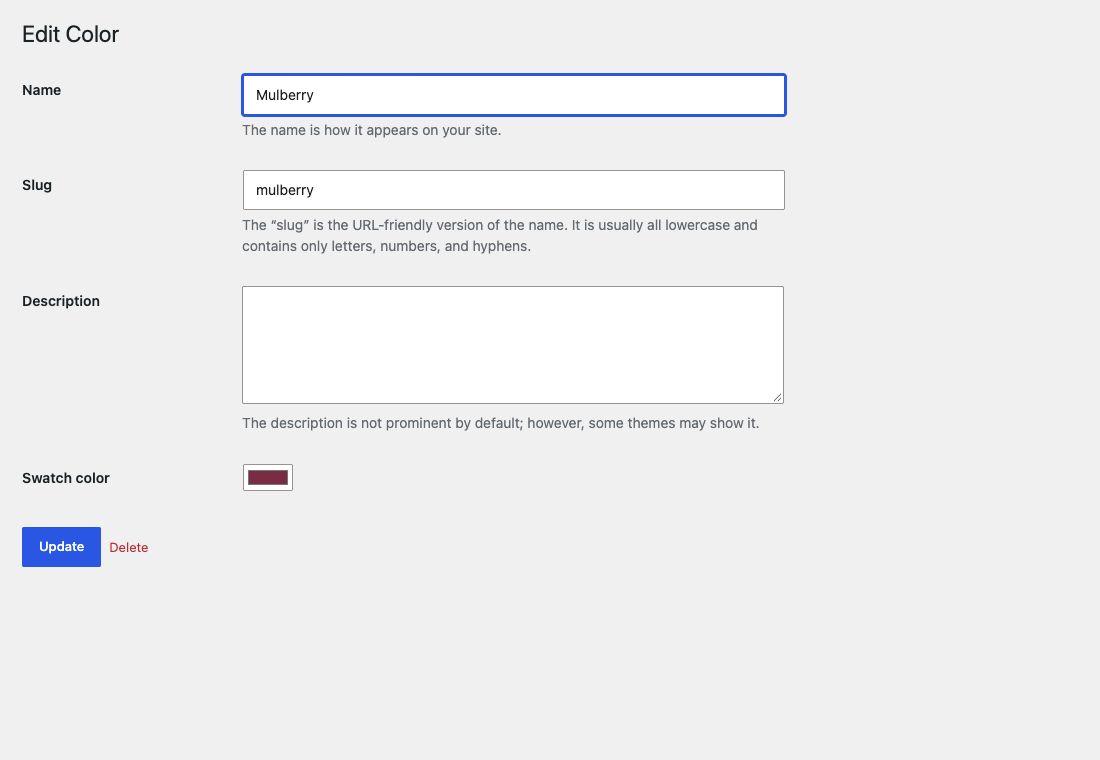
For Color terms, set their Swatch color using the theme’s color field and save.
Assign these global attributes to products. A per-product text attribute with the same name is not a substitute for the global Color taxonomy when you want its swatches/filter.
Products → Attributes: the global attribute names and slugs used by Purlia. Choose Configure terms to manage their values. Select the image to view it at full size.Edit a Color term and set its Swatch color. Mulberry is an illustrative demo value; use the actual shades you sell. Select the image to view it at full size.
Add a simple product
For a tool or kit without choices, create a Simple product. Fill in its name, price, category, description, short description, image and gallery. Configure stock and shipping data for the actual item, then publish and inspect the product page. Keep sample inventory separate from stock you sell.
Add a yarn with color variations
Create a product and choose Variable product.
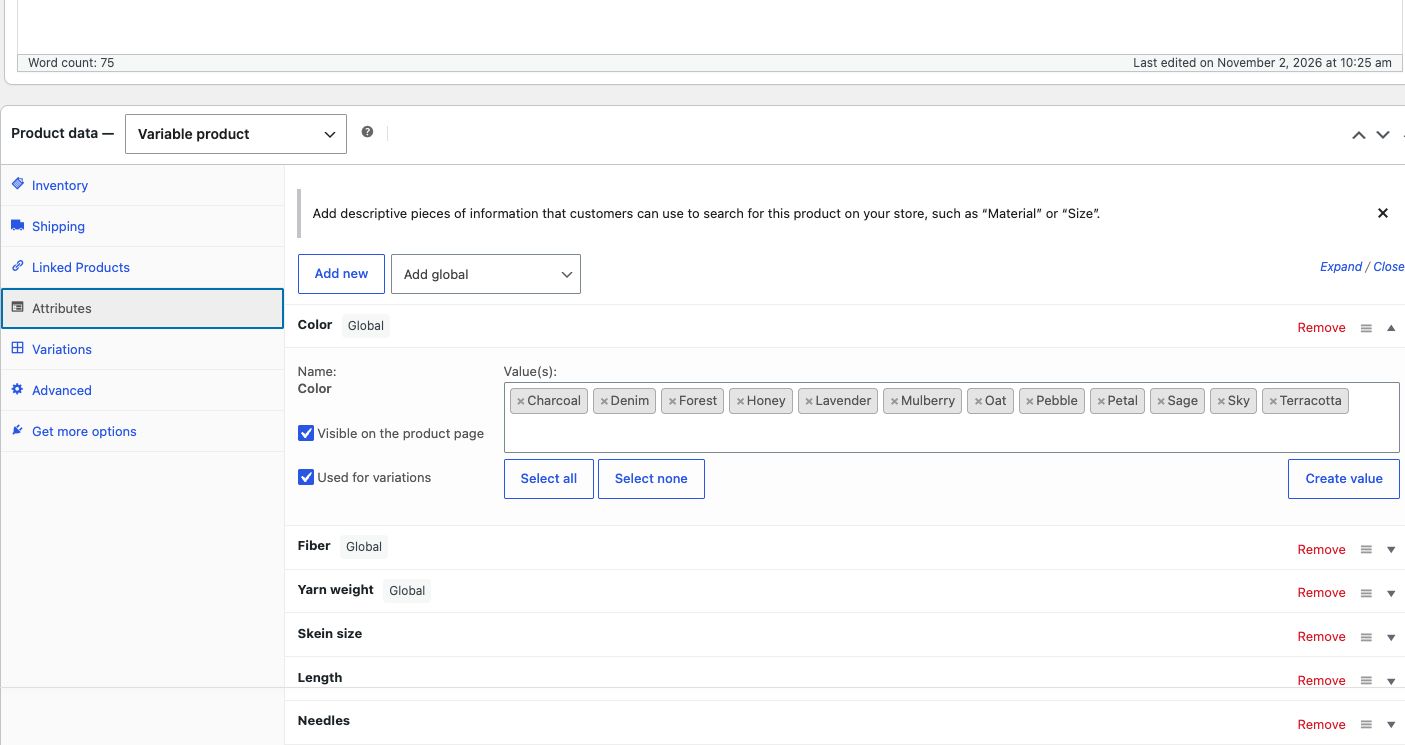
Assign its global Color values and mark Color as used for variations. Save the attributes.
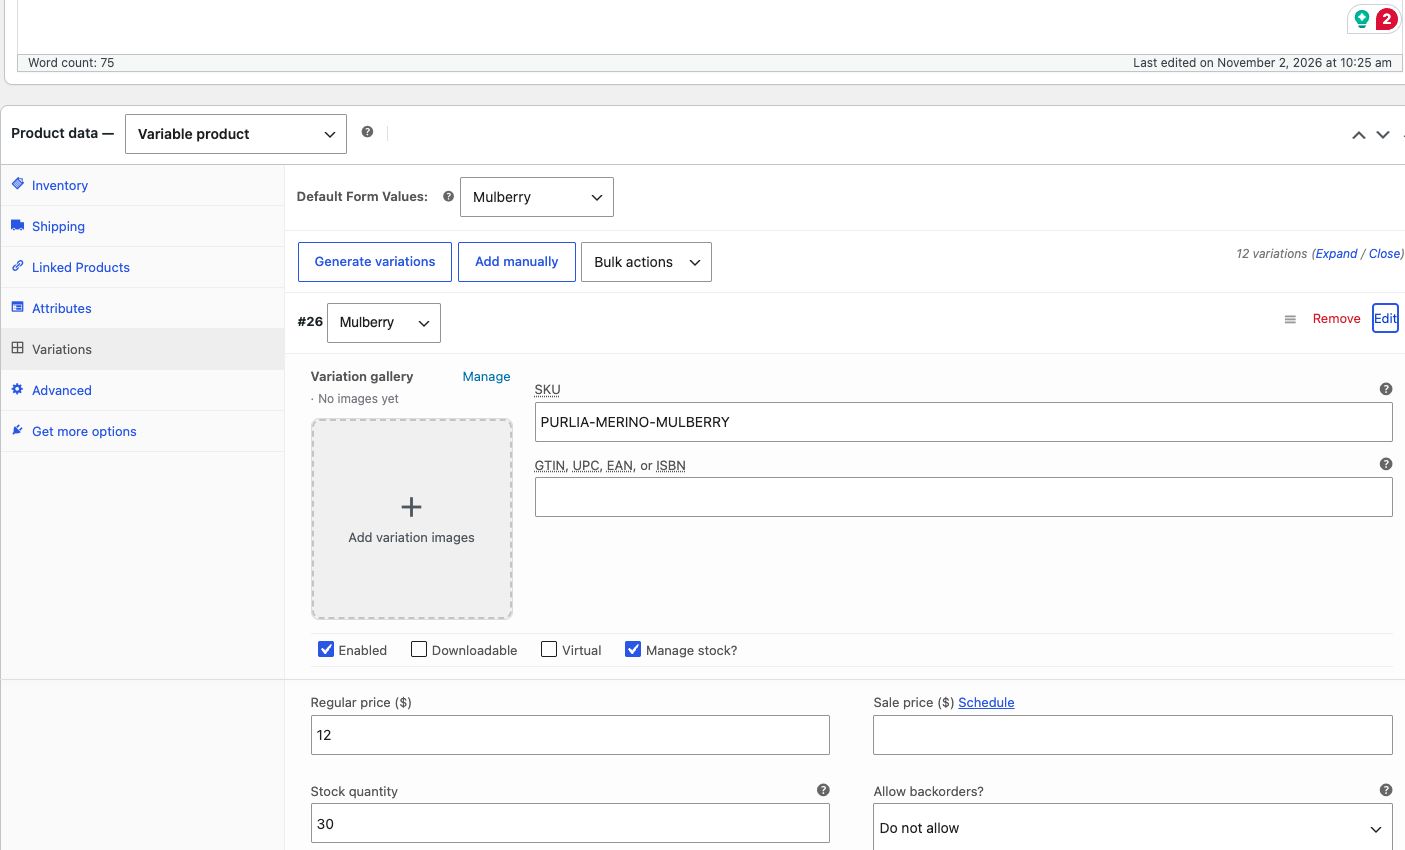
Create the variations you intend to sell. Each needs a price and an available stock status. Add a variation image if its color should show a different photograph.
Set a default color if you want the product to open with a choice selected. Publish, then select another color on the frontend and check the purchase button.
Test two quantities and an unavailable variation on staging before selling.
Product data → Attributes: assign global Color values and enable Used for variations before creating the variations. Select the image to view it at full size.Product data → Variations: expand one variation to set its price, inventory and image. The price and stock shown are demo data. Select the image to view it at full size.
Show product specifications
Purlia’s specification area reads the product’s attributes. Missing values are omitted; you do not need to fill every field.
Attribute
Example content
Fiber / Yarn weight
Merino wool / DK
Skein size
100g
Length
220m / 240yd
Needles
4–4.5mm / US 6–7
Gauge
22 sts × 30 rows / 10cm
Use your real supplier specifications. Purlia demo measurements are sample content. Keep short descriptions useful for customers rather than repeating every technical attribute.
Edit the catalog and filters
Edit the Product Catalog template in the Site Editor for the Shop layout. Its sidebar uses native WooCommerce filter blocks, not a classic Widgets sidebar. The price, attribute and availability controls read the catalog’s actual data. Keep their product-filter structure intact when restyling.
If a filter has no choices, assign the corresponding global attribute values to published products.
A zero-price preview product can extend the catalog’s price range down to zero.
The result count and sort control use native WooCommerce behavior.
Test filters on mobile: open Filter products, make a selection, Apply and confirm the result count.
Reviews and pagination
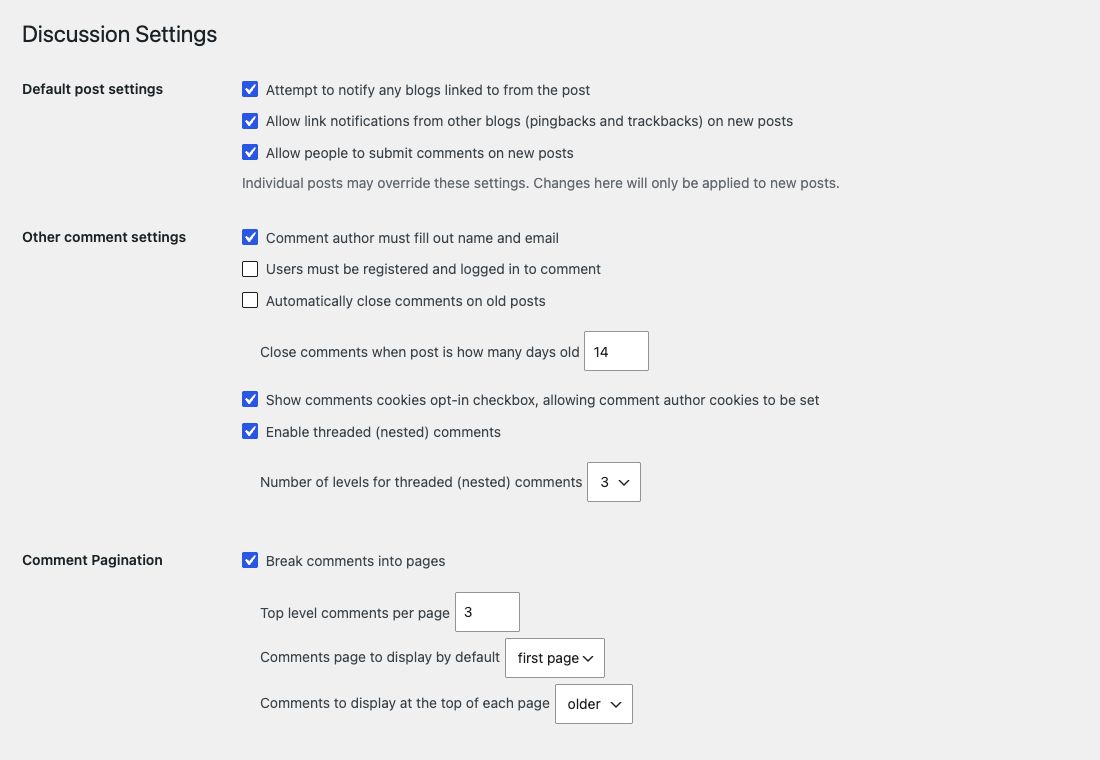
Manage product reviews with WooCommerce’s review settings and WordPress comment moderation. The review list and its page navigation inherit Purlia styling. WordPress Discussion settings affect paginated comments; test the product after changing pagination. Do not import sample demo reviews as genuine customer feedback.
Settings → Discussion: comment pagination controls. Three comments per page is a demo setting, not a requirement for your store. Select the image to view it at full size.
Cart, checkout & customer accounts
Keep native WooCommerce behavior while customizing the store’s presentation.
Assign the commerce pages
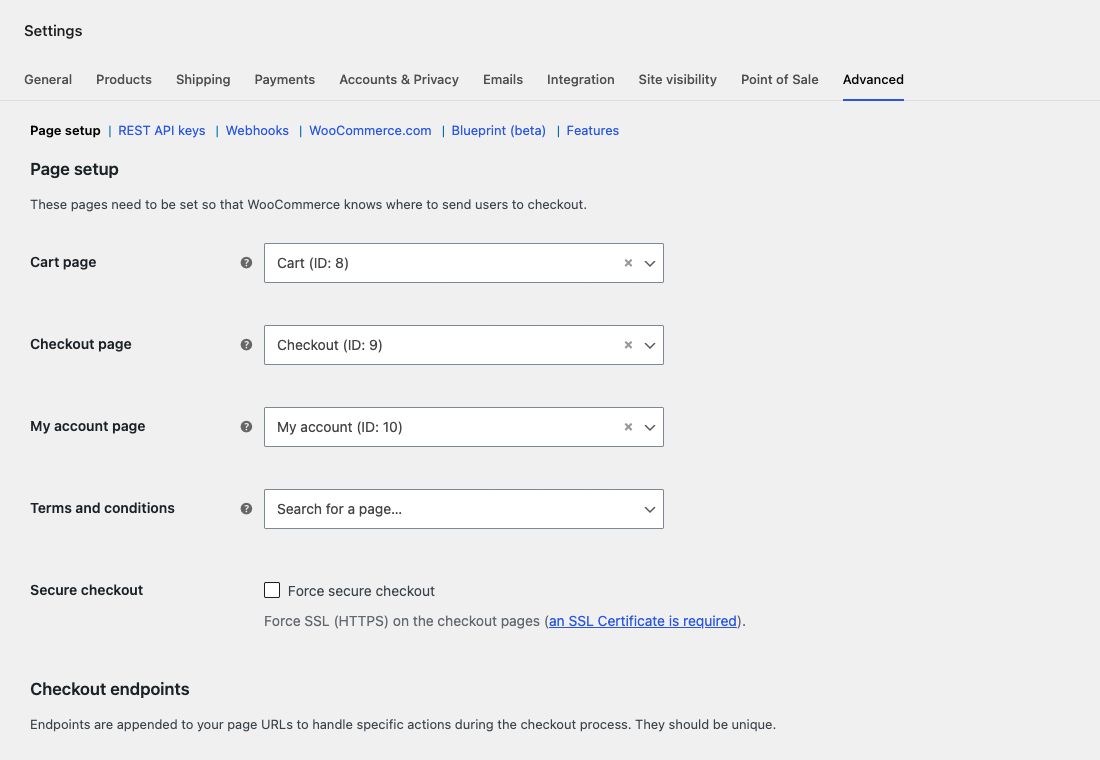
In WooCommerce → Settings → Advanced, confirm the Cart, Checkout and My Account assignments. Use the native Cart and Checkout blocks on their corresponding pages. The My Account page uses WooCommerce’s native account output. Purlia’s page layouts provide matching headings and help sections around that content.
WooCommerce → Settings → Advanced → Page setup. Select the corresponding pages on your own installation; imported page IDs will differ. Select the image to view it at full size.
Cart drawer and AJAX add to cart
Standard simple and variable product forms progressively add through WooCommerce without a full page reload and open its native cart drawer after success. Quantities, stock and variations are validated by WooCommerce. Grouped/external products and forms with extra extension fields retain their native submission path; normal form submission remains when JavaScript is unavailable.
Find the Mini Cart template part in the Site Editor. Depending on the WooCommerce version, it may appear among Template Parts or through the Mini Cart editing controls.
Edit its title, introduction, empty-state content and native button labels. Retain the native products and footer blocks.
On staging, add an item, change its quantity, remove it and check the empty drawer. Confirm totals before proceeding to Checkout.
Configure shipping and match your announcement
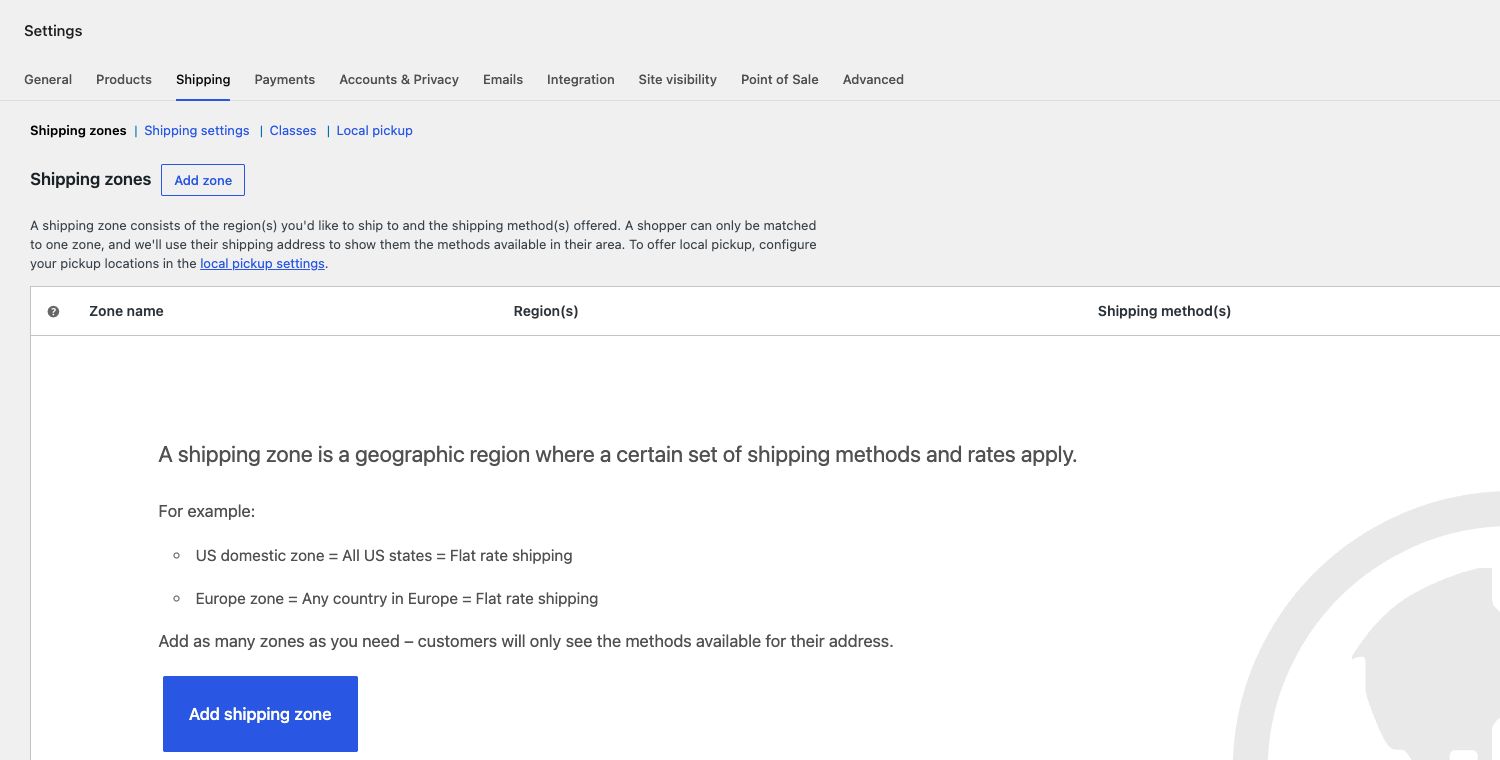
For physical items, configure WooCommerce → Settings → Shipping. Create zones for the regions you serve, add methods and test an address in each zone. Customers receive the methods for their matching zone. Check that physical products are not accidentally marked Virtual.
If your header advertises free shipping over a threshold, configure the corresponding WooCommerce rule. The announcement is editable text and does not activate that offer. Update Shipping & Returns copy to match the actual rates and regions.
WooCommerce → Settings → Shipping → Shipping zones. This example has no zones yet; choose Add zone and configure the regions and methods your store supports. Select the image to view it at full size.
Tax, payment and coupons
Set the store address, currency and units in WooCommerce; configure tax according to your store’s requirements.
Configure a payment gateway under WooCommerce settings and use that gateway’s sandbox/test instructions. The theme does not provide payment credentials.
Create coupons in WooCommerce’s Coupons screen, often under Marketing → Coupons. Test an eligible and an ineligible basket.
Check totals after a shipping address, coupon or quantity changes. Keep dynamic commerce pages and cart API responses out of full-page caching.
Login, registration and recovery
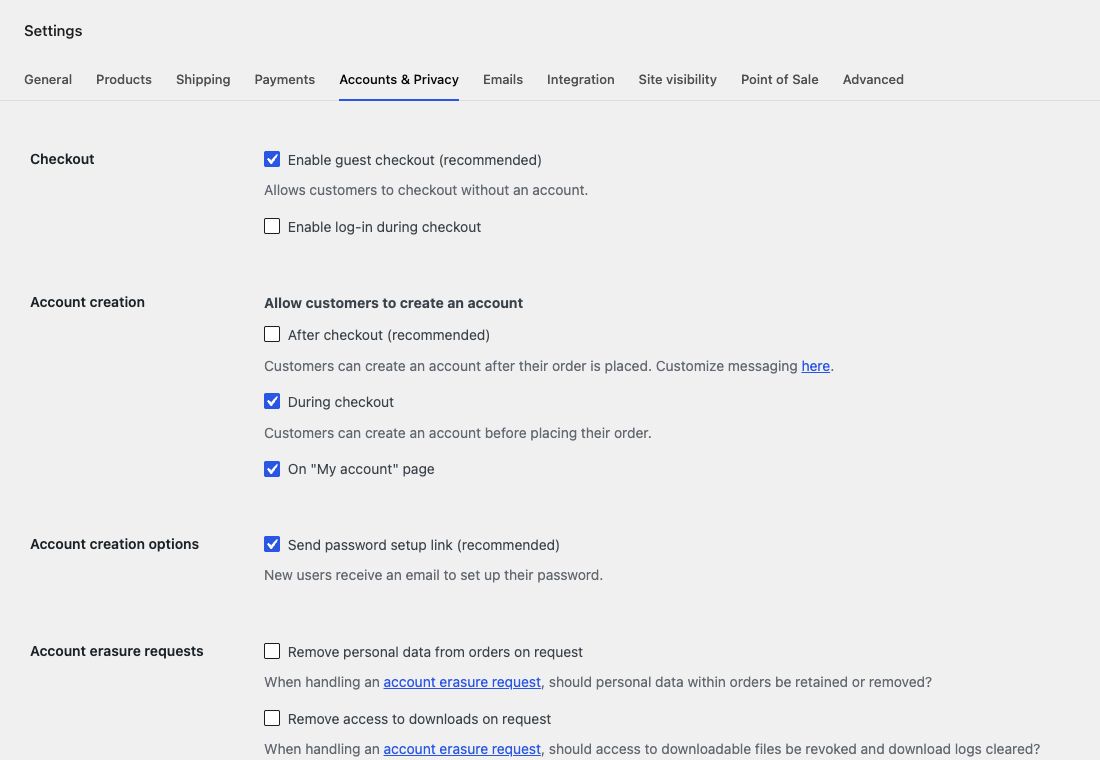
Enable registration in WooCommerce → Settings → Accounts & Privacy if you want the Register form. Purlia styles login, registration, lost/reset password and account endpoints. Changing the welcome or dashboard image uses their named template parts; see Images & Media Library.
Test password recovery with an account and email address you control. Email delivery is provided by WordPress/WooCommerce and your email setup, not by theme styling. Test the password visibility button with the keyboard as well as the mouse.
WooCommerce → Settings → Accounts & Privacy: enable account creation on the My Account page when you want the Register form. Select the image to view it at full size.
Order received and order tracking
The Order received screen uses WooCommerce’s order-confirmation flow and access checks. Review it after a sandbox order; do not link publicly to a real customer’s receipt. The Order Tracking page uses the native order ID and billing email verification. Wrong details should not expose another order. The form reports WooCommerce order status; live carrier scans require a separately configured tracking integration.
Pages, Journal & pattern library
Create the supporting pages that make your store useful and trustworthy.
Page setup reference
Page
Suggested slug
Purlia pattern
Template
About Us
our-story
About Purlia
About Us, or the automatic our-story page layout
Contact
contact
Contact Purlia
Contact Us
Shipping & Returns
shipping-returns
Purlia shipping and returns
Shipping & Returns / matching slug layout
Order Tracking
order-tracking
Purlia order tracking
Order Tracking / matching slug layout
Pattern library
patterns
Purlia pattern library
Automatic matching-slug page layout
Wishlist (optional)
wishlist
Use the plugin’s output
Wishlist / matching-slug page layout
Create the page, insert its matching pattern, select a custom template where listed, then publish. Slug-specific layouts apply automatically when the slug matches. If you choose a different slug, select a matching available template or build the desired page layout yourself.
Edit the page’s actual content
Open the page under Pages, choose its relevant Group/Image/Heading block in List View and edit the existing content.
Replace contact details and policy copy. Delete placeholder information you cannot provide accurately.
Update buttons and text links. A page title change does not automatically update every custom Navigation label or copied link.
Save, then check the page on desktop/mobile. If a template does not include Post Content, editing the page body will not appear; use the correct Purlia template.
Set up the Journal
Create an empty page such as Journal with slug blog.
Select it as the Posts page in Settings → Reading.
Create posts with a title, body, category, excerpt and Featured Image. Publish them.
Edit the Blog Home and Single Posts templates for shared archive/article presentation. Edit individual stories under Posts.
Point the Header’s Journal link at the assigned Posts page.
The Posts page acts as an archive; its ordinary page body is not the Journal layout. Featured Images supply the article/card photos. For comments, use Settings → Discussion and each post’s Discussion controls. Enable paginated comments if desired and check replies/page navigation.
Build the pattern library
Create a page with slug patterns and insert Purlia pattern library. Its collection reads WooCommerce products in the category with slug patterns. Craft filter links use product tags knitting and crochet.
Create the Patterns product category and the craft tags you want to use.
Add a product for your licensed design, assign the Patterns category and matching craft tag, and provide a clear preview image and description.
Retain the provided library query structure when restyling so the craft filters continue to target the collection.
If selling a PDF, configure the real downloadable product and test delivery after a sandbox purchase. Do not assume the three sample preview products contain sale-ready PDFs.
The marked demo previews are non-purchasable sample notes. Create your own actual product rather than repurposing a marked preview without reviewing its status, price, files and copy.
Sell a real downloadable pattern
In WooCommerce, configure a Simple or Variable product as Downloadable, add the authorized file and define any download limits/expiry you need. Mark it Virtual only if nothing physical needs shipping. Review the store’s downloadable-product settings and complete a sandbox purchase to confirm that the customer can access the file.
Search and 404 layouts come from theme templates. Edit them in the Site Editor to change their copy or empty-state artwork. Test an actual search with results, one without results and a nonexistent page. Keep Search controls functional when restyling.
Newsletter, contact form & wishlist
Connect only the services you plan to use. Forms need their own configuration to deliver data.
Connect the Footer newsletter
Install and activate MC4WP: Mailchimp for WordPress.
In the plugin’s Mailchimp settings, enter your own API key directly in WordPress and confirm the connection. Do not put a key in the theme or share it in a public support ticket.
Create a published signup form. Select the intended Audience in its settings and review its subscription/confirmation options.
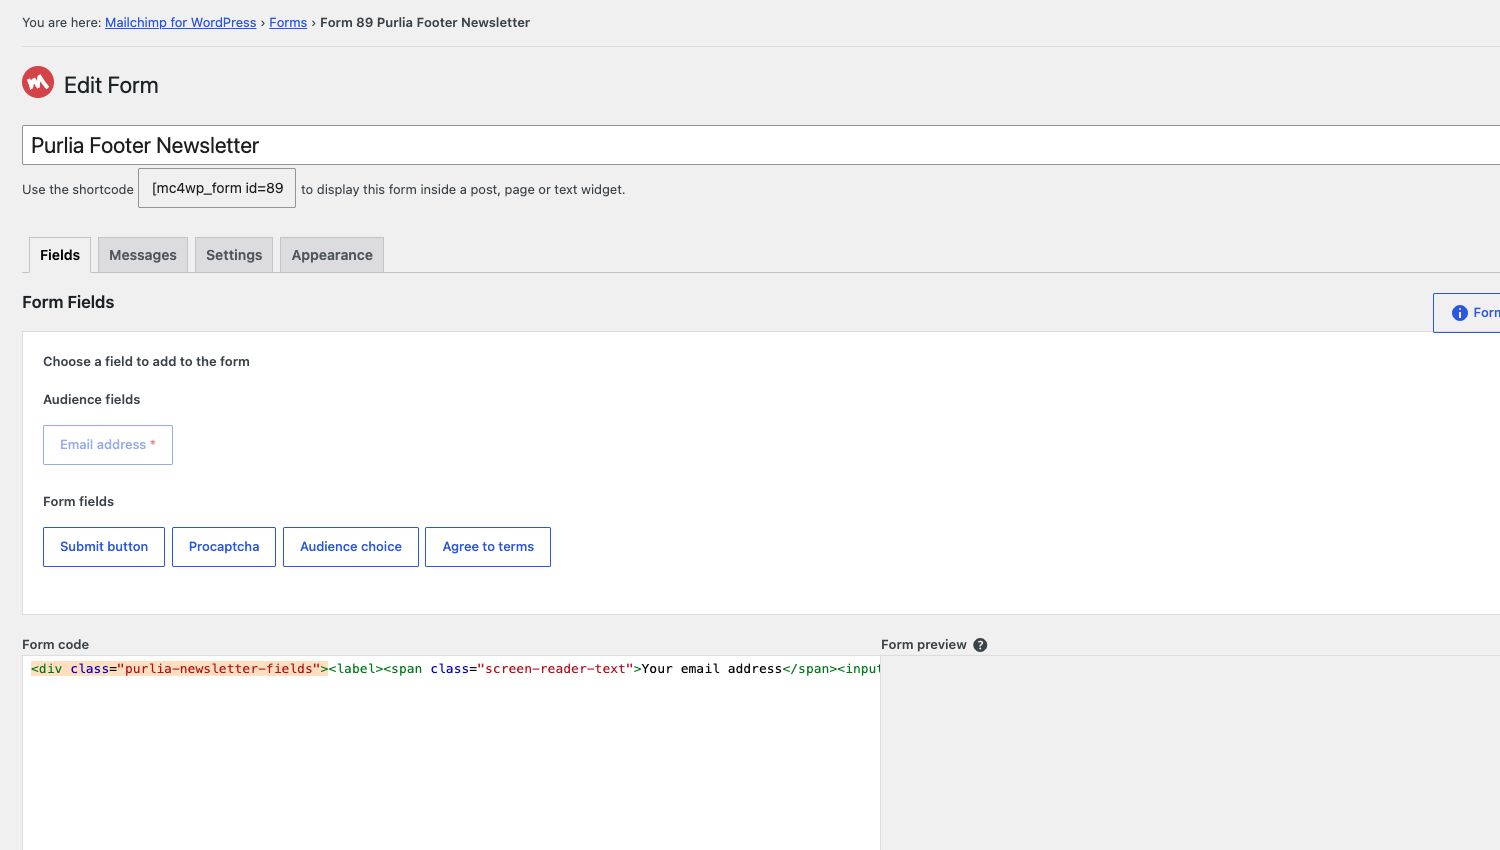
Use the Purlia form markup below if you want the matching email-and-arrow layout. Save the form.
Edit the Footer, select its MC4WP block and choose your form. If the block is absent, insert the plugin’s form block into the newsletter group.
Test using an address you control and confirm the expected result in Mailchimp, including any confirmation step.
MC4WP → Form → Fields: edit your signup form and note its own shortcode or form ID. Use Settings to select your Audience; an example form ID does not connect Mailchimp automatically. Select the image to view it at full size.
Newsletter form markup
Paste this into the MC4WP form editor, not a page’s Custom HTML block. The plugin provides the outer form and handles submission. Add any consent wording required for your own store; the snippet is a layout starting point.
Install and activate WPForms, then create your form in its own editor.
Add the fields you need, such as Name, Email and Message. Set the recipient notification address and a useful confirmation message.
Open the Contact page, select its WPForms block and choose the new form. If the pattern shows availability text instead of a form block, replace that text with a WPForms block.
Preview the actual page and submit a controlled test. Check the recipient’s inbox/spam folder and the configured form response.
If delivery fails, inspect the form’s notification and your WordPress email setup. Styling alone cannot deliver an email.
Wishlist is a separate optional plugin, not a feature required to activate the theme. If ApusThemes supplies its ZIP with your purchase or separately, install it using Plugins → Add New → Upload Plugin and activate it.
Create or select the Wishlist page with slug wishlist.
Add a Shortcode block containing the plugin output:
shortcode
[purlia_wishlist]
Apply the Wishlist template if needed, then test saving/removing products. If the separate plugin was not supplied, skip this integration and remove wishlist links you do not want to expose. Do not install an unrelated similarly named plugin and expect identical behavior.
Before publishing any form
Select a real form created on the current site; an imported numeric form ID can refer to nothing or to a different form.
Use clear field labels and understandable validation messages.
Configure account/service settings in the plugin rather than in theme files.
Verify actual delivery/subscription behavior with controlled test data.
Update your store’s data and consent information to match the services you enable.
Updates, translation & maintenance
Keep your customizations portable and your store understandable after updates.
Update the theme
Back up both the database and files and test on a staging copy.
Review the new release notes and any data migration instructions.
Install the new theme ZIP through your approved update workflow. If replacing an installed theme manually, confirm the name/version before replacing it.
Inspect saved Site Editor template overrides: a customized template can continue to take precedence over updated theme files. Back it up before selectively resetting it.
Check header/navigation, a product, account screens, cart and checkout. Publish the tested update when your store’s workflow allows it.
Keep your own changes
Use the Site Editor and page/product editors for normal content changes. For PHP/CSS code changes, use a child theme or an appropriate custom plugin so an update does not overwrite the files you edited. Keep a record of additional CSS and the template/part each change affects. Purlia is a block theme; there is no separate theme-options framework to maintain.
Translate the store
Choose the WordPress site language under Settings → General.
For theme interface strings, use a translation tool that supports the text domain purlia. The source catalog is languages/purlia.pot.
Store custom translation files in the location recommended by your translation tool so updates retain them.
Translate sample pages, product descriptions, Navigation labels and form content separately in their editors.
Preview long translations on mobile, including buttons, notices, product titles and submenu items.
WordPress/WooCommerce/plugin translations are separate from theme translations. Changing the site language does not rewrite English demo content you imported.
Maintain images and caching
Upload sensibly sized, compressed images and confirm Media thumbnails are generated by the host.
Use the native image ID rather than pasting theme-file URLs into page HTML.
Let WordPress or your chosen optimization plugin handle responsive image delivery. Purlia retains Media metadata.
Cache public pages appropriately for your host, while excluding personalized Cart, Checkout, My Account and cart API responses.
After optimization changes, test variation selection, AJAX add to cart, the drawer and checkout. Do not treat one Lighthouse run as a guaranteed score for every store.
Review after design changes
Keep text readable against its background and do not remove visible keyboard focus.
Use meaningful headings, link text, field labels and image alternative text.
Check menu, Search and the cart drawer using Tab, Shift+Tab and Escape.
Preview content at narrow widths and with enlarged text.
Use real, readable error messages and confirm controls can be reached without a mouse.
If you need to roll back
Use the matched database/files backup from before the update, or restore only the specific content/template revision when the issue is isolated. A previous theme ZIP does not reverse a content migration by itself. Keep staging and the public store clearly separated while investigating.
Troubleshooting
Start with the symptom, check the relevant screen and change one thing at a time.
A useful first check
Reproduce the issue on staging, note the affected URL and compare the setting against the relevant guide. Check browser errors and WooCommerce status where applicable. If a recent optimization/plugin change triggered it, test that change in isolation before making broad edits to the theme.
Common questions
WordPress says the theme stylesheet is missing
Upload the inner installable purlia-1.0.1.zip. A full submission/documentation bundle has another folder level and is not the theme installation file.
The homepage has empty image slots
Choose your own images in the native Image blocks or import the optional demo Media. Purlia 1.0.1 does not load its content photos from the theme folder or import them on activation.
Editing the Home page does not change Home 1
Home 1 uses the Front Page template’s content. Edit it through Appearance → Editor → Templates → Front Page. Home 2–4 use page content with their matching templates.
An updated template still looks like the old version
Check whether the Site Editor has a saved customized template/part. That override can take precedence over the theme file. Back it up before selectively resetting it; avoid resetting every customization just to diagnose one screen.
The wrong image appears after import
Finish the provided demo finalizer so attachment IDs match the target site. If working manually, select the correct Media item again in the Image block. Inspect the actual page after clearing relevant caches.
Color circles do not appear
Check that Color is a global attribute with slug color, that terms have swatch colors and that the product uses those values. Other attribute selectors remain native. Do not create a second local text attribute as a substitute.
A variation cannot be added to the basket
Check its selected attributes, enabled status, price and stock. Each sellable variation needs valid data. If a third-party extension adds fields, test its native submission path and verify its own configuration.
Add to cart reloads the page or the drawer does not open
Confirm that JavaScript and the WooCommerce cart API can load. Some product types/extension forms use native submission intentionally. On staging, inspect optimization conflicts, cached security tokens and API restrictions; exclude personalized cart responses from caching.
A shop filter is empty or returns no items
Confirm published products have values in the matching global attribute. Reset other filters and check catalog visibility/stock. Edit the catalog template’s native filter blocks, not a classic Widgets sidebar.
The Patterns page is empty
Use the patterns page slug and library pattern. Assign products to the patterns product-category slug. Use knitting/crochet product tags for the craft filters. Restore the supplied library query block if its structure was rebuilt incorrectly.
The Register form is missing
Enable registration on My Account in WooCommerce → Settings → Accounts & Privacy. The theme styles the form when WooCommerce makes it available.
The newsletter says it will be available soon
Connect MC4WP, choose the correct Audience and select a published form in the Footer. Verify the form belongs to this site; an imported ID does not create a connected Mailchimp account.
The contact form or recovery email does not arrive
Check the form notification or WordPress/WooCommerce email configuration and the recipient’s spam folder. Test delivery separately from page styling; a visible success message alone is not proof of inbox delivery.
Shipping options do not appear
Review the customer address, shipping zones/methods and whether the product is physical or Virtual. A free-shipping announcement does not create a method. Test a known address against the intended zone.
Pages or products return 404 after migration
Confirm their published slugs and update internal links. Re-save Settings → Permalinks. If the issue continues, ask the host to inspect rewrite configuration.
Order tracking does not find an order
Use the actual WooCommerce order ID and the matching billing email. Verify those values on a synthetic/test order. Do not weaken WooCommerce’s order access checks to make incorrect details work.
If the issue remains
Send the steps to reproduce it and the affected screen to the support channel shown with your purchase. Include version details and a screenshot that does not reveal customer information or service credentials. See Launch and support for a useful support-request template.
Launch checklist & support
Check the finished store, then keep a useful support record.
Store launch checklist
Use these checks on staging and then verify the published store. Ticks are stored only in this browser when local storage is available; they are your notes, not an automated certification.
Ask for support with useful details
Use the support channel shown with your Purlia purchase. Describe one reproducible issue at a time. Do not post an administrator password, API key, order key or private customer data in a public request.
For a custom design or feature outside the theme’s supplied behavior, describe the desired result separately so the publisher can advise on the appropriate next step. This guide does not change the support terms associated with your purchase.
Links open the respective vendor documentation. Plugin capabilities and UI labels can change; follow the documentation for the version installed on your site.